My passion for quilting erupted out of nowhere one sunny afternoon during a cozy craft fair visit.
I was casually browsing the stalls filled with fasteners and yarns, but my eyes landed on a booth displaying a breathtaking quilt.
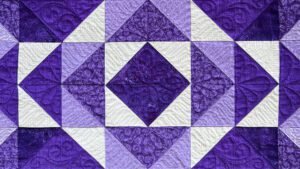
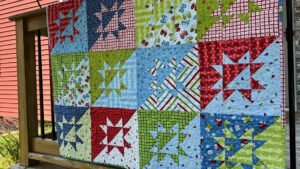
The moment I spotted the intricate 8-Point Star Block shimmering in the sunlight, I was captivated!
I lingered there, staring at how the points aligned perfectly, resonating with an aura of excellence and creativity.
That was it—I had to learn this pattern!
From that day forward, my journey with the 8-Point Star Block began.
I plunged into the world of fabric choices and vibrant colors, trying to recreate the magic I had witnessed.
I immediately realized how special this particular pattern is to the quilting community, combining tradition with infinite possibilities.
It has repeatedly brought me joy, and I’m thrilled to share how you can craft your shining masterpiece!
Starry Simplicity: The Timeless Appeal of the 8-Point Star Block
The 8-Point Star Block is immensely revered in quilting circles for good reason!
At first glance, it might seem like a straightforward design, but there’s a distinct beauty embedded in its simplicity.
This block brings together eight striking points fashioned through flying geese units—creating a stunning center piece that holds the potential to transform your entire quilt into a true work of art.
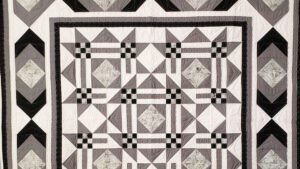
Whether you lean towards a bold color palette or prefer more traditional fabrics, the adaptability of the 8-Point Star makes it very appealing.
Each time you sew the 8-Point Star Block, consider how the style represents you and your aesthetic.
I love watching as the block’s points intersect, forming a beautiful star that captures the heart of any quilt.
And guess what?
You can explore countless designs to enhance your quilting repertoire.
After just one successful attempt, you’ll be craving more of these starry beauties!
Precision and Play: The Essentials of the 8-Point Star Block
When it comes to piecing the 8-Point Star Block, every stitch matters.
While the design is friendly to novices, achieving that precision requires a little bit of focus and practice.
Gather your materials before diving in; a little organization will go a long way here!
As you start addressing your star points, don’t forget that difference in fabric contrast.
Whether you choose bright solids or textured patterns, this contrast amplifies the star’s beauty exponentially.
Also, take your time to get used to the techniques.
I promise that dedicating a moment to ensure the direction of patterned fabrics will save you from potential mishaps later.
So, roll up your sleeves, get comfy, and let’s create something remarkable—our 8-Point Star Block awaits!
Materials:
- Fabric:
- 1 piece (10 ½” square) for the centerpiece
- 8 pieces (5 ⅞” squares) for the star points
- 4 pieces (5 ⅞” squares) for the background
- 4 rectangles (5 ⅞” x 11 ¼”) for the background
- 4 pieces (5 ⅞” squares) for the corner blocks
- Rotary Cutter: For precise fabric cutting.
- Cutting Mat: To protect your surface and ensure accurate cuts.
- Ruler: Essential for measuring and cutting your fabric pieces.
- Sewing Machine (or hand sewing tools): For piecing the block together.
- Iron: To press seams flat during construction.
- Thread: In colors that match your chosen fabrics.
- Fabric Pen: To mark lines for accurate piecing.
Getting Ready to Sew: Tips for Success
Before diving into your sewing adventure with the 8-Point Star Block, let’s set up for success!
Organizing your materials and cutting pieces ahead will create a smooth experience.
I suggest using contrasting colors to elevate your star design’s visibility.
This will ensure that every point shines through vibrantly.
Moreover, paying close attention to your fabric’s orientation transforms your block into a stunning statement piece.
A few minutes spent carefully studying the layout and marking directions will enhance the overall outcome of your 8-Point Star Block.
Alright, it’s time to jump into the hands-on section!
Step-by-Step Instructions:
Below, I’ll guide you through the process of making your very own 8-Point Star Block.
Check out the full pattern via the provided link, and let’s create the magic!

Full Pattern: Click Here
Additional Tips:
Making your 8-Point Star Block truly shines with a few extra pointers!
Ensure you stick to a consistent ¼” seam allowance; this trick will help your pieces fit together seamlessly, maintaining that beautiful symmetry.
Also, remember to gently press your seams rather than dragging the iron across them.
This small adjustment can prevent distortion and keep your star looking fabulous!
Finally, don’t shy away from using pins during assembly—they’re your best friends when it comes to alignment, especially with those intricate star points!
As you stitch away, I’d encourage you to step back often and admire your progress; it’s a wonderful feeling to see your vision come to life one piece at a time.
The Shining Moment: Finish and Celebrate!
As you complete your exquisite 8-Point Star Block, take a moment to savor your accomplishment!
This block not only embodies the perfect intersection of creativity and precision but also serves as your stepping stone into the vast realm of quilting.
Think of all the possible projects that can sprout from this versatility!
Whether you’re adding a single block or using multiple together, the 8-Point Star Block is a dynamic contributor to any quilt’s personality.
If you have enjoyed this exciting journey of crafting, be sure to dive into the treasure trove of articles I have waiting for you!
Each piece is packed with inspiration and knowledge to spark your creative flair.
You can unleash another genius adventure right here.
Let’s keep the quilting spirit alive, and I can’t wait to see what you make next!