Every time I sit down to quilt, it’s like embarking on a new adventure full of colors, patterns, and textures.
Recently, I found myself completely enamored with the process while working on the All the Trimmings Quilt.
It’s not just any quilt; it’s an explosion of creativity wrapped in fabric that brings both joy and warmth to my home.
I remember the first time I pieced together a quilt top; the feeling of satisfaction when I finally saw those squares and triangles aligning just right was priceless!
And trust me, the All the Trimmings Quilt offers that exact thrill and a whole lot more.
As I started diving into this project, I was reminded why I fell in love with quilting in the first place.
There’s something magical about creating a cozy quilt that can be cherished for years to come.
The All the Trimmings Quilt captures the essence of seasonal beauty, perfectly blending traditional quilt techniques with the ability to showcase my personal style.
So, if you’re ready to embark on this quilting journey with me, let’s get to it!
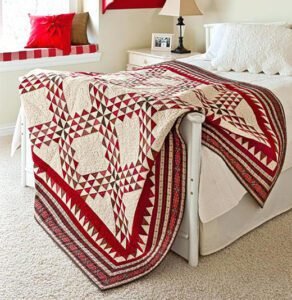
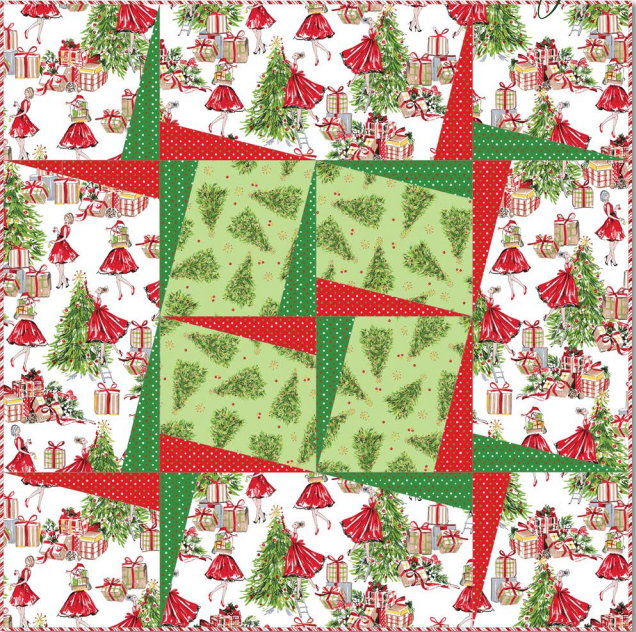
Exploring the Charm of All the Trimmings Quilt
When I first laid my eyes on the All the Trimmings Quilt pattern, it was like being transported into a world of nostalgia and warmth.
Designed by the talented Debbie Beaves for Maywood Studio, this quilt doesn’t just come to life with its geometric shapes; it’s an embodiment of the holidays and the nostalgia that resonates with so many of us.
No matter where you hang or lay it, it instantly transforms any space into a cozy enclave filled with cheer!
But what really stands out about the All the Trimmings Quilt is the way it combines craftsmanship with artistry.
Every stitch becomes a part of your story, weaving heirloom-quality memories into something that you, your family, and friends will cherish forever.
There’s a rich history tied to this quilt that allows us to appreciate not just the craft but also how quilts serve as a canvas for self-expression.
Materials Needed
- Various fabric colors (specific measurements for squares, triangles, and borders)
- Quality sewing machine
- Rotary cutter and cutting mat
- Quilting ruler
- Pins or clips
- Thread matching fabric colors
- Iron and ironing board
- Batting for the quilt middle
Preparing for Perfection
Preparation truly makes all the difference in quilting.
When embarking on the All the Trimmings Quilt, I can’t stress enough the importance of ensuring that you have all your materials gathered and organized prior to starting.
This means washing and pressing your fabrics to preempt any surprises later on, like shrinkage or distortion, which could affect the outcome of your beautiful quilt.
Once that’s done, the next logical step is to carefully cut your fabric pieces according to the specifications provided in the All the Trimmings Quilt pattern.
This attention to detail in your cutting will set the stage for a much smoother and enjoyable sewing process later on.
Remember, precision is key!
Step-by-Step Instructions
Now that you’re well-prepared, let’s dive into the step-by-step instructions for creating the All the Trimmings Quilt.
Below the image, you will find detailed directions to guide you through each stage of this project.
Want to ensure you have full access to the pattern?
Don’t forget to check the link provided!
Full Pattern: Click Here
Additional Tips
As you move forward with your All the Trimmings Quilt, remember it’s all about enjoying the process!
Take your time piecing everything together.
I always find making small adjustments along the way really helps in creating a polished end result.
And don’t shy away from experimenting!
This is your quilt and your canvas.
Another tip is to keep your workspace organized.
A clean, organized area not only makes for a better sewing experience, but it also allows you to focus fully on your piece.
Trust me, the last thing you want is to be digging around for your favorite pins halfway through the quilting process!
The Joy of Piecing Together
One of my absolute favorite parts of working on the All the Trimmings Quilt is piecing together the various squares and triangles.
Each piece represents a tiny victory, a small part coming together to create the larger picture.
It’s crucial to pay attention to your design and double-check that those beloved triangles fit just snugly into place!
We all have different ways of piecing our work.
Whether you prefer more traditional methods or some modern techniques, keep experimenting.
Your style will shine through the final product of the All the Trimmings Quilt, giving it a touch of personal flair that tells your unique story.
Wrapping Up Your Quilting Project
As you approach the final steps of your All the Trimmings Quilt, it’s all about the finishing touches.
Don’t rush through binding; this stage is crucial because it not only finishes your quilt but also adds a stunning outline that accentuates your hard work and dedication.
Double-check all seams and edges to ensure everything is just right!
Finally, take a moment to step back and look at your handiwork.
The journey of creating the All the Trimmings Quilt brings more than just pride in completion; it’s a reminder of the skill and creativity you’ve harnessed along the way.
Each quilt tells a story, and yours is uniquely yours.
Celebrate Your Quilt Crafting Journey
In conclusion, the All the Trimmings Quilt has not only left me with a beautiful piece of art but has also developed my skills and deepened my appreciation for this wonderful craft.
Take pride in every stitch and turn of fabric, knowing that you’re upholding a tradition that weaves together creativity and passion.
If you’re on the lookout for more insightful articles and unique quilting patterns, you’re in the right spot!
Our blog is filled with tons of amazing content just waiting for you to explore.
Dive deep into the creative portal by embarking on an adventure that you can find right here.
Can’t wait to see you around!