One of my fondest memories growing up was the time I spent with my friends.
We would spend hours playing, laughing, and creating memories that I still cherish to this day.
As we grew older, we all went our separate ways, but we always found a way to stay connected.
One of the ways we did this was through quilting.
We would each create a block and then combine them to create a quilt, a tangible reminder of our friendship.
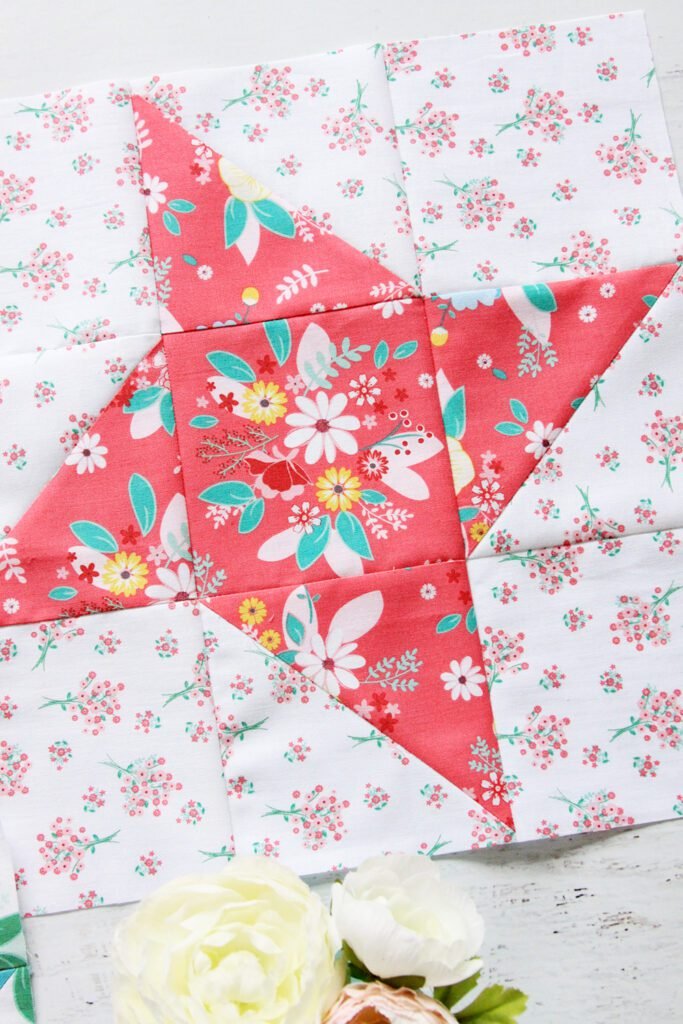
Recently, I’ve been working on a Friendship Star Quilt Block, a block that reminds me of those times.
And I’m excited to share the process with you.
This block is a beautiful example of how creativity brings us together and showcases our individuality.
Making the Friendship Star Quilt Block is not just about the finished project; it’s about reliving those moments where we connected and bonded through our craft.
The Timeless Charm of the Friendship Star Quilt Block
The Friendship Star Quilt Block is a classic quilt block that has been around for many years.
It’s a block that is simple yet visually stunning, a block that can be made in different sizes to suit your needs.
This block is part of the Riley Blake block challenge, and it’s been a joy to work on.
Each time I create a new piece, I think of all the friendships and memories tied to quilting, and it inspires me to make the Friendship Star even more special.
This quilt block has a great mix of shapes and colors that come together beautifully.
The Friendship Star is the perfect quilt block for beginners and experienced quilters alike.
Whether you’re looking to personalize your quilt or showcase your fabric collection, the Friendship Star Quilt Block gives you the freedom to express yourself while connecting with those beautiful memories.
Gathering Materials for Your Friendship Star Quilt Block
To make the Friendship Star Quilt Block, you’ll need a variety of materials.
Gather these essentials to get started:
- Fabric: Choose an assortment of prints for your star and background.
- Rotary cutter and mat: For accurate fabric cutting.
- Ruler: A clear quilting ruler is necessary for precision.
- Iron and ironing board: Keep your different pieces pressed and neat.
- Thread: Select matching thread that complements your fabric.
- Needles: Standard quilting needles work best for piecing your block.
That’s it!
With these materials at hand, you’re ready to embark on your quilting journey.
As for my project, I chose fabric from my Sugarhouse Park fabric collection for Riley Blake Designs, mixing in some prints from collections past.
Selecting materials that resonate with you adds an extra layer of meaning to the Friendship Star Quilt Block.
Choose colors that evoke fond memories; it makes the process all the more enriching!
Preparation is Key
Before you jump into creating the Friendship Star Quilt Block, take a minute to prepare.
Lay out all your materials in an organized fashion so you can easily access them as you go.
Consider creating a dedicated workspace with good lighting and enough room to spread out your fabric.
This will make the process feel smoother and allow you to get into the creative zone.
Additionally, having a plan can help you avoid unnecessary errors.
I like to sketch out my design ideas before I cut my fabric.
This way, I can visualize how the colors will work together, ensuring that my final quilt block not only reflects my memories but also looks harmonious and beautiful.
Step-by-Step Instructions for the Friendship Star Quilt Block
Now, let’s dive into the step-by-step instructions for making the Friendship Star Quilt Block.
Follow the directions below, but remember, you can access the full pattern through the link provided:
Full Pattern: Click Here
Additional Tips for a Successful Block
When making the Friendship Star Quilt Block, keep these tips in mind for a successful crafting experience.
Always cut your fabric accurately to maintain the integrity of your quilt block.
Using a rotary cutter instead of scissors can help achieve clean edges and more uniform pieces.
This precision will lead to a polished final product!
Additionally, don’t rush the sewing process.
Take your time, especially when aligning pieces together.
Pinning your fabric before sewing can prevent slipping and ensure your seams line up beautifully.
Ultimately, it’s all about enjoying the journey and making the Friendship Star Quilt Block your own.
Exploring Advanced Techniques and Personalization
Once you’re comfortable with the basics, think about exploring advanced techniques for your Friendship Star Quilt Block.
Consider experimenting with fabric dyeing or even adding intricate quilting patterns to enhance the overall look of each block.
With a bit of imagination, there are countless ways to personalize your quilt.
You might also want to consider creating a larger quilt that incorporates multiple Friendship Star blocks.
Each block can represent a memory or special moment in your friendships, making it a beautiful keepsake.
So, gather your friends and start stitching the stories of your journeys together!
Celebrate Your Craft!
As you reach the finale of creating the Friendship Star Quilt Block, take a moment to reflect on not just the process, but what this quilt block represents.
Each stitch holds memories, joy, and love shared with friends; that makes every quilt so valuable.
So, go ahead and celebrate your creative journey!
And if you’re eager to discover more engaging quilting content, or perhaps another project you can dive into, explore my blog with tons of delightful articles waiting for you.
I’ve prepared an incredible piece you can check out by clicking here.
Thank you for joining me in the wonderful world of quilting, and I hope you enjoy making the Friendship Star Quilt Block as much as I did!