In 2018, I decided to dive headfirst into the vibrant world of quilting, and what a wild ride it’s been!
From color choices to patterns, there was so much to explore.
One day, while I was admiring a quilt I had just finished, an exhilarating idea sparked in my mind: why not create a unique quilt block that embodies my journey?
And that’s how the Anvil quilt block came to life—filled with intrigue and a healthy dose of challenge!
As I started this project, little did I know how significant the Anvil quilt block would become in my quilting repertoire.
This design is not just about piecing shapes together; it tells my story of adventures in fabric.
In this tutorial, I will take you along with me as we navigate the enchanting field of creating your very own Anvil quilt block.
There is something truly magical about transforming fabric into a work of art!
Digging Deeper into the Anvil Quilt Block’s Design
The Anvil quilt block features sharp points and geometric movements, which not only emphasize its name but also showcase the precision required in quilting.
Its layout creates a beautiful visual effect that can be both modern and classic, depending on your fabric choices.
I wanted this block to symbolize strength, just like its name suggests—a powerful testament to the skills all quilters aspire to master.
Using both the traditional and paper piecing techniques, the Anvil quilt block offers versatile approaches to cater to different quilting styles.
Whether you’re a rookie or a seasoned pro, there’s a little something for everyone in this block.
Let’s make this journey even more meaningful as we honor creativity and perseverance through our quilts!
Gathering Your Supplies for the Anvil Quilt Block
To craft your stunning Anvil quilt block, let’s gather our materials.
Here’s what you’ll need:
- 1⅞” x 1⅞” square of Dark fabric (for Paper Piecing)
- 2⅜” x 2⅜” square of Light fabric (for Paper Piecing)
- 3⅜” x 3⅜” square of Dark fabric (for Paper Piecing)
- 2⅜” x 2⅜” square of Medium fabric (for Paper Piecing)
- 1¾” x 1¾” square of Dark fabric (for Paper Piecing)
- 3⅜” x 3⅜” square of Medium fabric (for Paper Piecing)
- 1½” x 1½” square of Dark fabric (for Traditional Piecing)
- 1 7/8” x 1 7/8” square of Light fabric (for Traditional Piecing)
- 2 7/8” x 2 7/8” square of Dark fabric (for Traditional Piecing)
- 1 7/8” x 1 7/8” square of Medium fabric (for Traditional Piecing)
Once you’ve rounded up these supplies, you’ll be ready to embark on your Anvil quilt block adventure.
There’s something extra special about choosing fabrics that resonate with your personality, so have fun perusing your stash or hitting up your local fabric shop!
Getting Prepared for the Crafting Journey
Before we dive into creating our Anvil quilt block, here are a few quick tips.
Preparation is key to achieving a clean finish.
Make sure all your fabric pieces are ironed flat to prevent any unwanted creases in your blocks.
A crisp edge will make it easier to sew and match points accurately.
Additionally, don’t forget to measure twice and cut once!
This adage resonates so well in quilting.
You want those lines to be precise, especially since the Anvil quilt block has many intricate points to contend with.
Take your time and enjoy the process—it’s part of the joy of quilting!
Step-by-Step Instructions for the Anvil Quilt Block
Below, you’ll find the step-by-step instructions for both paper piecing and traditional piecing methods to create your Anvil quilt block.
A full pattern link is provided for you to access after the image!
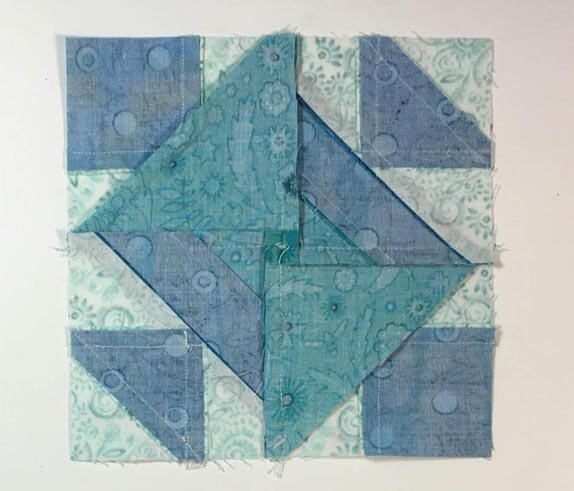
Full Pattern: Click Here
Additional Tips for Success
As you sew your Anvil quilt block, keep these tips in mind to help you along the way.
First, using a quarter-inch foot will be a game-changer for this project.
It ensures consistent seam allowances, which are crucial in achieving those sharp points and clean lines.
Also, don’t shy away from using pins when matching seams and points together—especially in the Anvil design.
It may take a bit more time, but it pays off in the precision of your blocks.
And if you find yourself in a tough spot, remember, it’s all about enjoying the journey.
Exploring Advanced Techniques with the Anvil Block
For those who want to take their Anvil quilt block to the next level, consider playing with color placement!
By utilizing varying shades of the same color or going bold with contrasting colors, you can create a visually stunning piece that expresses your unique style.
Experimenting with additional embellishments like embroidered accents or fabric paint can also add personal touches to your Anvil quilt block.
The beauty of quilting is that there are no hard and fast rules—let your creativity flow!
Celebrate Your Craft: Unleashing Creativity
As we wrap up this journey of crafting your Anvil quilt block, take a moment to celebrate your hard work.
Each quilt block you create is not just a piece of fabric; it’s a representation of patience, skill, and creativity.
Whether you’re adding your Anvil block to a larger quilt or using it as a stunning standalone piece, you’ve created something remarkable!
If you’re eager for more inspiration, our blog is filled with tons of fantastic content to explore!
I truly believe in the power of creativity and the joy that quilting brings to our lives.
Ready for another adventure?
Check out an incredible piece waiting for you right here.
Until next time, happy quilting, and may your Anvil quilt block shine brilliantly in your collection!