Whenever I start a new quilt, I feel the same thrill akin to opening a gift.
The anticipation of what’s to come gets me buzzing like a kid on candy!
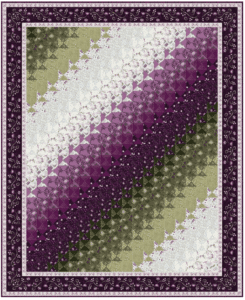
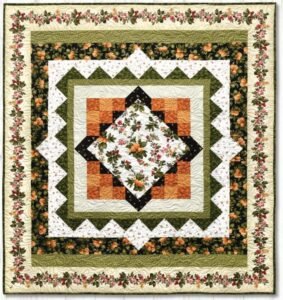
The Carnaby Street Quilt has been on my radar for a while now, and I can’t tell you just how excited I was to dive right into this amazing project.
The elegance infused in the urban design of this quilt truly brings out my creative side, and wow, did I have some fun!
This quilt isn’t just for expert quilters; it’s also perfect for all you confident beginners out there!
With a cozy size of 56” x 68”, the Carnaby Street Quilt is sure to lift your spirits while you create your very own masterpiece.
So, whether you’re wrapping it around yourself or showcasing it as a stunning décor piece, the results will be simply breathtaking!
Fabric Selection: A Color Palette Inspired by Urban Vibes
If there’s one thing that I adore about the Carnaby Street Quilt, it’s how vital fabric selection is to shaping its personality.
The vibrant colors and patterns are what breathe life into your quilt, and choosing wisely is crucial.
This quilt, especially, thrives on chic fabric combinations that reflect its sophisticated design.
Think urban flair meets whimsical charm!
Let’s talk practicality, too!
While aesthetics matter, we also want fabrics that are high-quality and durable.
I’ve found that mixing patterns and textures not only adds depth but also encapsulates your unique style.
So, gather those coordinating colors, blend a little funk with elegance, and let’s get crafting!
Mastering the Essentials for the Carnaby Street Quilt
Before we jump into all the fun sewing and cutting, it’s key to gather all your supplies.
You need to have everything ready, like a knight preparing for battle!
I mean, you wouldn’t want to start cutting only to realize you’re missing a crucial tool, right?
Hence, let’s compile an essential list for this fabulous journey of making the Carnaby Street Quilt!
For this playful project, you will need assorted fabrics, batting, backing fabric, and your trusty sewing machine, among other tools.
Get those rotary cutters and quilting rulers ready because we’re about to make some magic happen, and I want you all set for this incredible crafting adventure!
Precision Cutting for a Flawless Finish
Now comes the part that really gets my adrenaline pumping—cutting!
The precision in each cut is essential for the overall crispness of the Carnaby Street Quilt.
Each piece needs to fit together seamlessly; it’s like assembling a masterpiece, where every detail matters.
It’s a blending of art and math, and trust me, there’s nothing more satisfying than slicing through fabric like a pro!
Just make sure to measure, measure, measure!
I can’t stress enough how important it is to be precise with your cuts.
Using rotary cutters and quilting rulers effectively will make all the difference.
You’re not just cutting fabric; you’re laying the foundation for a beautiful quilt!
Materials List for the Carnaby Street Quilt
- Fabric Selection: Assorted fabrics per pattern, in coordinating colors and designs.
- Batting: A suitable size of quality batting for warmth and structure.
- Backing Fabric: Coordinating fabric for the quilt’s back.
- Sewing Machine: Reliable sewing machine for piecing and quilting.
- Cutting Tools: Rotary cutter, quilting ruler, and fabric scissors.
- Threads: High-quality threads in colors matching your fabric selection.
- Quilting Pins and Needles: For piecing, basting, and quilting.
- Binding Fabric: Strips of fabric for the quilt’s edge finishing.
- Measuring Tape: For accurate fabric measurements.
Preparation: Setting the Stage for Success
Before you dive in, let’s chat about preparing your materials.
Trust me, this part often makes or breaks your project!
Start by pre-washing your fabrics—this helps prevent shrinkage and color bleeding.
There’s nothing worse than peeling off your freshly quilted layers only to see a shocking new pattern emerge!
After washing, dry and iron your fabrics until they’re as smooth as a fresh canvas!
This will ensure that your pieces lie beautifully flat while you work on them.
By giving the Carnaby Street Quilt a proper start, you are setting yourself up for a magnificent finish!
Step-by-Step Instructions:
Ready to embark on the crafting adventure?
Below you’ll find your route mapped out step-by-step.
The full pattern can be accessed via the provided link to guide you thoroughly through every stitch and seam.
Each step is designed to elevate your confidence and creativity with the Carnaby Street Quilt!

Full Pattern: Click Here
Final Touches: Polishing Your Piece
As you stitch away, don’t forget to enjoy the process!
The journey of completing your Carnaby Street Quilt is as important as the end result.
After all that hard work, take a moment to inspect your quilt; check for those lovely finishing details, and don’t hesitate to add a sprinkle of personal embellishments!
When it comes time to care for your beautiful quilt, remember that all those hours of dedicated work deserve the best.
Treat your quilt with the love it deserves, and it’ll continue to brighten your space for years to come!
Celebrate Your Creative Journey!
Completing the Carnaby Street Quilt is more than just finishing a project; it’s a testimony to your creativity and the time invested in your craft.
As you find a cozy corner for your quilt or showcase it proudly, remember all the steps you took to bring it to life.
You’ve done an incredible job, and I hope this quilt inspires new adventures and growth in your quilting journey!
And hey, if you’re ready to explore more amazing quilting ideas, this blog has tons of content waiting for your discovery.
Trust me, there’s always something new to learn and create!
You can check out an incredible piece by clicking this magical link.
Let’s keep the creative waves rolling!