Quilting has always been a personal journey for me, a way to blend creativity with patience and attention to detail.
I remember the joy of piecing together small bits of fabric, each with its own story and shade, to create something bigger and more meaningful.
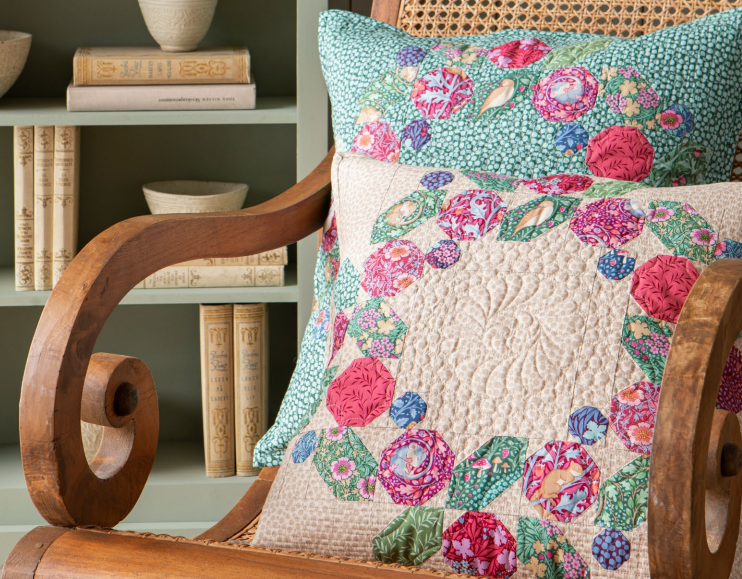
One of my favorite recent projects is the Berry Wreath Cushions, designed to complement the beautiful Berry Wreath Quilt.
These cushions come in a few colorways, but today I’m focusing on the Beige and Lafayette versions.
These pieces are versatile and add a cozy, handcrafted elegance to any room.
The Subtle Art of Cushion Design: Crafting the Berry Wreath Cushions is what makes this project so special.
The Berry Wreath Cushions are designed with intricate blocks framed by a delicate border, creating a classic yet vibrant look.
Both the Beige and Lafayette colorways bring out different elements of the same design, and the versatility of these fabrics allows for a unique outcome in each cushion.
From subtle eucalyptus tones to deep plum and hibiscus accents, each cushion tells a story of color harmony, designed to enhance any living space with ease.
Choosing the Perfect Colorway for Your Home
Selecting the right colorway is crucial to making these cushions your own.
While the Beige colorway offers a warm, earthy base, perfect for neutral-toned or rustic interiors, the Lafayette colorway introduces a more dramatic look with deep, lush hues that suit contemporary and modern spaces.
Both options use a variety of coordinating fabrics, bringing visual depth to the cushion and creating a striking complement to the Berry Wreath Quilt.
Materials Needed for Berry Wreath Cushions (Beige Colorway)
- Fabric 1: ⅝ yard (60cm) of Eucalyptus beige
- Fabric 2–18: Assorted fabrics in small squares (3-inch and 1¾-inch pieces) – includes shades such as Slumbermouse plum, Winter Rose hibiscus, and Autumn Bloom sage
- Wadding (batting): 22-inch (56cm) square
- Lining fabric (optional): 22-inch (56cm) square
- Backing fabric: ½ yard (50cm) – Olive Branch blush
- Binding fabric: ¼ yard (25cm) – Eucalyptus beige
- Piecing and quilting threads
- Quilter’s ruler, rotary cutter, and mat
- Five 16mm buttons (optional) for fastening
- Cushion pad to fit cover
Note: If you have made the Berry Wreath Quilt, some leftover fabrics might be repurposed for this cushion project, making it both economical and eco-friendly.
Getting Started: Tips for a Smooth Sewing Process
Before diving in, take time to organize and prep your materials.
Make sure your fabrics are pre-washed and pressed to ensure clean, precise cuts.
Accurate measurements are key in quilting, so rely on a high-quality rotary cutter and a sturdy ruler.
Additionally, reading through all instructions to understand the sequence before you begin – quilting is as much about planning as it is about stitching.
Step-by-Step Instructions for the Berry Wreath Cushions
Get ready for some fun!
Below are my step-by-step instructions for making the Berry Wreath Cushions.
Remember, you can access the full pattern via the link provided below!
Full Pattern: Click Here
Step 1: Cutting Out Fabric Pieces
Begin with Fabric 1 for the cushion border.
Cut two strips 1½ inches x 18 inches for the side borders, and two strips 20 inches x 1½ inches for the top and bottom borders.
For the remaining pieces, cut according to the layout guide provided.
Piece a – Four rectangles, 3 inches x 5½ inches, Piece b – Four rectangles, 3 inches x 1¾ inches, Piece c – Four 1¾-inch squares.
Repeat this process for the rest of the fabrics as specified in the materials list.
Each piece has been thoughtfully measured to contribute to the unique Berry Wreath block.
Step 2: Assembling the Block Sections
Using Fig.
D as a reference, assemble the block in sections.
Create corner triangle units using a pencil-marked diagonal line.
Place each small square on a larger fabric piece, align edges, and sew along the marked line.
Trim excess fabric ¼ inch from the sewn line and press open.
Construct Unit 1 with four corner triangles.
Move to Unit 2, which also has four corner triangles but on a larger base.
Continue with Unit 3 and Unit 4, each with two triangles on opposite corners.
Step 3: Assembling Section 1
Follow Fig.
G to piece together a Section 1 block.
Arrange all unpieced parts as shown, sew in sequence, and press each seam.
Repeat three more times for a total of four Section 1 blocks.
This repetitive motion makes you feel accomplished, seeing those blocks build up towards your final cushion!
Step 4: Completing Section 2 and Section 3
Using Fig.
H, piece together Section 2 in rows, then assemble.
Do the same for Section 3 following Fig.
I.
As you piece these sections together, take a moment to appreciate how it all begins to take shape and how your Berry Wreath Cushions are slowly coming to life.
Step 5: Building the Wreath Block
With all sections complete, arrange them into the wreath shape following Fig.
J.
Sew sections into rows, press seams in opposite directions for neatness, and sew rows together to complete the 18-inch block.
At this point, you should step back and admire your hard work – how beautiful your Berry Wreath Cushions are starting to look!
Step 6: Adding Borders
Sew the short border strips to each side of the block.
Press seams outward and add the top and bottom strips, completing the bordered 20-inch cushion face.
The borders help to frame the beautiful design you’ve created and truly elevate the look of your cushions.
Step 7: Quilting and Cushion Assembly
Make a quilt sandwich with the patchwork top, batting, and optional lining.
Quilt as desired, trim edges, and prepare for final assembly.
Hem the edges of the backing fabric pieces and attach buttonholes and buttons for closure.
Once this part is complete, breathe in the satisfaction of your creation!
Your Berry Wreath Cushion is almost finished.
Additional Tips for Finishing Touches
Button Placement: Equally space the buttons along the hemline to create a neat closure.
Binding Techniques: Use a walking foot on your sewing machine for even stitching along the binding.
Custom Quilting Patterns: Consider a simple diagonal cross-hatch pattern for durability or add floral stitching to mimic the wreath theme.
Celebrating Your Craftsmanship!
Completing the Berry Wreath Cushion is a rewarding project that offers not only a beautiful cushion but a deep sense of accomplishment.
The careful piecing, the layering of fabrics, and the final assembly showcase the skill and artistry of quilting.
Each stitch and seam adds to the narrative of your quilted creation, whether you choose the warm Beige colorway or the bold Lafayette.
Display it with pride, knowing it’s crafted with love and patience, making any space feel a little more like home.
If you’re excited about discovering more wonderful projects, you’re in the right place!
My blog is bursting with amazing content, and I’ve prepared something truly special for you by clicking here.
Keep exploring and create magic with your stitching!