As someone who loves to craft, there’s something truly magical about transforming a stack of fabric and a few bits and bobs into a useful, personalized item.
That’s why I was so excited when I discovered the Mini Maker Station pattern.
It’s like a breath of fresh air for my creative space!
I vividly remember my first attempt at it; I felt a little like a kid in a candy shop, buzzing with excitement and anticipation.
I can’t even begin to tell you how many times I’ve had my supplies scattered all over my workspace.
The need for organization was clear!
There I was, in the middle of creating a masterpiece, frantically searching for my scissors, not to mention that one elusive crochet hook.
That’s when I realized that the Mini Maker Station could be my creative sidekick, providing me with a charming and efficient way to keep everything in check.
Organizational Marvel: The Hidden Superpower
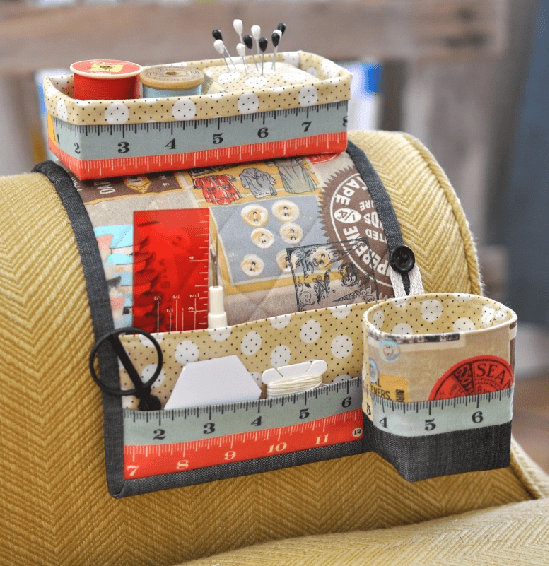
The beauty of the Mini Maker Station lies not just in its design but also in its functionality.
It hosts a thin piece of metal inside the body, making it magnetic-friendly!
That’s right – it can hold more than just threads; it has a little hidden superpower.
Magnetic accessories can be brilliantly arranged, keeping your crafting essentials within arm’s reach while adding a fun twist to your workspace!
This pattern is an ideal project for advanced beginners, allowing you to enhance your quilting skills while witnessing a remarkable transformation in your workspace.
So, whether you’re looking to declutter your craft corner or want a functional, chic station, this project is where you need to be!
Versatile Pockets and Endless Customization
One of the standout features of the Mini Maker Station is its handy pockets.
With options for Pocket A and Pocket B, you can easily organize scissors, pens, or even crochet hooks.
I absolutely love how versatile the pockets are!
Keeping things organized is not only satisfying but also encourages creativity.
Knowing where everything is while you work on your projects makes all the difference.
And let’s talk about customization!
The sky’s the limit when it comes to fabric choices.
I was able to mix and match patterns and colors that suited my style, which turned out to be a delightful process in itself.
In a way, the Mini Maker Station reinforces not just an organization system but also helps you define your unique aesthetic.
Materials for Your Mini Maker Station
- Two pieces of fabric for the body (cut to width x 17”) – front and back
- One piece of batting (the same width x 17”)
- One strip of Pellon SF101 Interfacing (cut to width x 2.25”)
- Two pieces of Pocket A fabric (cut to width x 7”)
- One piece of Pellon SF101 Interfacing for Pocket A (cut to width x 3.5”)
- Two pieces of Pocket B fabric (cut to width x 4”)
- One piece of Pellon SF101 Interfacing for Pocket B (cut to width x 2”)
- Two WOF strips for binding (cut to 1.5” each)
- One piece of 26 gauge galvanized sheet metal
- Three round disc magnets for the basket
- One round disc magnet for the pincushion
- Fabrics for a pincushion and fabric basket as described in the pattern
Prepare for Fun and Creativity!
Before you dive into your Mini Maker Station project, I highly recommend that you gather all your materials in one place.
This isn’t just about organization; it significantly enhances the overall crafting experience!
As a pro tip, skim through the entire pattern before you kick things off to visualize the final product.
Don’t rush it!
Take your time selecting the fabrics and prepping your materials.
Each item you select adds to your craft’s character, and soaking in that creative energy is absolutely rewarding.
Trust me; you’ll want to soak in every little bit before starting with the Mini Maker Station!
Step-by-Step Instructions:
Now that we’ve covered the exciting details, I’m thrilled to share that I’ve detailed the step-by-step instructions for completing your Mini Maker Station just below this section.
Trust me, once you see it starting to take shape, the excitement is palpable—and the results will leave you jumping with joy!
Full Pattern: Click Here
Additional Tips for Success
Be sure to keep a trusty seam ripper on hand.
Trust me, no matter how skilled you are, mistakes happen and are a part of the crafting experience.
This little tool will be your best friend as you work on your Mini Maker Station!
Don’t hesitate to personalize the pockets with different stitches; not only does this serve a decorative purpose but it adds a touch of heart to your project.
Have fun selecting your fabrics!
If you’re anything like me, you might find yourself overwhelmed by which colors to choose.
But remember, keep it light-hearted; creativity knows no bounds.
This project is crafted to inspire and uplift your crafting adventure, so give yourself permission to explore!
Crafting Excitement with the Mini Maker Station
Once you’ve completed your very own Mini Maker Station, don’t forget to revel in your accomplishment!
Share your final product on social media with the hashtag #minimakerstation.
Whether you’re proud of the neat pockets or the way everything holds together, this pattern represents your newfound crafting skills.
Why not spread the joy?
For more fabulous articles packed with insightful tips and creative projects, feel free to roam around the blog!
There’s a treasure chest of ideas just waiting to be uncovered.
I’ve set up an exciting piece for you to explore, and you can check it out by traipsing over here!
Celebrate Your Crafting Journey!
Looking back, my journey with the Mini Maker Station has been nothing short of fulfilling.
It’s not merely about finishing the project; it’s about relishing the joy and peace it brings into my crafty abode.
I encourage you to celebrate every victory, no matter how small, along your creative path!
So, gear up, grab those materials, and let’s unleash our creativity together!
The Mini Maker Station is poised to become your new favorite crafting companion, transforming not only your workspace but thoroughly enriching your crafting experience.
Happy crafting!