My fascination with quilting began in my cozy living room, surrounded by the rich colors and intricate patterns of quilts that told stories of our shared passions.
One quilt, in particular, always captured my imagination – a stunning piece that seemed to glow like a stained glass masterpiece, with colors dancing against the light.
This quilt wasn’t just a blanket; it was a piece of art filled with warmth and memories.
This quilt served as my inspiration to embark on a journey of my own, weaving my stories into fabric and thread.
Today, I want to share with you the process of creating the “Kashmir” quilt, a project that resonates with the intricate beauty of those cherished memories, beckoning both seasoned quilters and newcomers alike.
The Essence of Kashmir: A Quilt of Many Colors
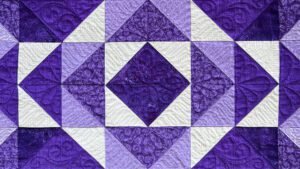
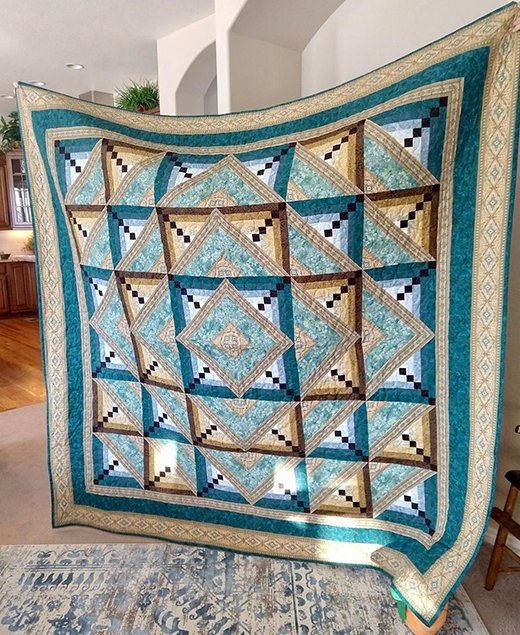
The “Kashmir” quilt is more than just a pattern; it’s a vibrant celebration of color, paying homage to the lush designs echoing the Kashmir fabric collection.
This quilt, with its stunning log cabin variation, mirrors the luminous quality of stained glass, where each piece of fabric plays a vital role in creating a captivating harmony of shades.
As you work on the “Kashmir” quilt, you’ll be inviting the surrounding beauty and complexity into your creation.
Each fabric choice contributes to a world where threads and patches meld into a finished masterpiece waiting to unfold.
The Foundation of Creativity: Preparing Your Palette
Before diving into the construction of the “Kashmir” quilt, gathering your materials and setting up your workspace is crucial.
The beauty of this quilt lies in both its precision and the rich detail of its patterns.
Here’s everything you’ll need:
- Fabrics 1-12: Each fabric serves a unique purpose, from bright borders to delicate inner pieces forming the quilt blocks.
- Template Plastic: Essential for accurate cutting of templates B and C, ensuring flawless pieces that fit seamlessly into your design.
- Permanent Marker: To transfer markings from patterns to templates, including dots and mirror lines.
- Quilting Tools: Have a rotary cutter, cutting mat, and ruler on hand for precise fabric cutting.
- Sewing Supplies: Gather quality thread, sewing needles, and your trusty sewing machine, outfitted with a ¼-inch foot.
- Paper for Foundations: You’ll need plenty of copies of Block 1 and Block 2 Foundations, plus adhesive to tape and trim these foundations as necessary.
A Path Through Fabric: Beginning Your Journey
Before you start sewing, take a moment to visualize what your finished quilt will look like.
The “Kashmir” quilt represents accuracy and the beauty of colors melding together.
Think about how each piece contributes to the grand design, transforming mere fabric into an immersive storytelling adventure.
This quilt is more than an object; it reveals a connection to those who have come before us and those who will follow.
With your materials at the ready, let’s embark on a journey where each stitch becomes a link in our quilter’s heritage.
Step-by-Step Instructions: Weaving the Tapestry of Kashmir
Embarking on the construction of the “Kashmir” quilt is akin to starting a new chapter in a story brimming with colors and patterns.
Follow these detailed steps to breathe life into the vibrant and intricate “Kashmir” quilt.
Step 1: Prepare Foundations & Templates: Create 20 copies of the Block 1 Foundation and 16 copies of the Block 2 Foundation.
Tape the sections together at the dashed line.
Then, for Templates B and C, make two copies each, tape them at the mirror line, and transfer patterns onto template plastic.
Don’t forget all necessary markings!
Full Pattern: Click Here
Step 2: Cut the Fabric: For the borders, cut strips from Fabrics 11 and 12 as per directions, adding a ¼-inch seam allowance.
For the block foundations, utilize Fabrics 1-12 as specified, converting squares into triangles where needed.
Step 3: Make the Foundations & Assemble Blocks: Follow the block numbers and piecing order to sew the Block 1 and 2 foundations.
After sewing, press the blocks and trim any excess fabric along the solid lines outside each block, but leave the paper intact for now.
Step 4: Assemble the Quilt: Create four identical sections from nine blocks each, sewing blocks into cohesive rows before combining those rows into sections.
Step 5: Make & Add Borders: For the middle border, join Fabric 11 strips end-to-end to create long strips.
Carefully follow the instructions for adding these borders to ensure the quilt is perfectly framed.
Step 6: Finish the Quilt: Gently remove paper foundations from the back of your quilt top.
Layer your quilt with the backing, batting, and top, then quilt it as desired to highlight the design you’ve created.
Finally, use Fabric 10 for the binding, applying your preferred method for a polished finish.
Additional Tips: Perfecting Your Creation
Remember, precision is paramount!
Keeping your seam allowances consistent will ensure a quilt that lies flat and looks professional.
Arrange your pieces thoughtfully before sewing to visualize color placements effectively.
As you quilt, explore patterns that could enhance the intricate design of your “Kashmir” quilt.
Take this opportunity to let your creativity shine, choosing thread colors that beautifully complement or contrast with your selected fabrics.
Celebrate Your Craft: Keep Creating!
Completing the “Kashmir” quilt is more than just an accomplishment; it’s a personal journey filled with design and craftsmanship unique to you.
As you hold your finished quilt, take pride in the effort, thought, and love sewn into every stitch.
The “Kashmir” quilt serves as a beautiful reminder of your skills and dedication!
For more fabulous quilt ideas and techniques, dive into the other treasure troves we’ve prepared just for you!
There’s a world of inspiration waiting at your fingertips; perhaps you want to uncover another amazing piece by clicking here.
Remember, with each quilt you embrace, you weave not only fabric but stories, memories, and joy.