Quilting has always been a delightful journey of creativity for me.
There’s a certain magic that happens when fabric meets a sewing machine; it’s like weaving a dream into reality!
One of the most memorable projects I embarked on was creating my first Star Bright Mini Quilt.
I can still recall the joy of choosing each fabric and watching my vision come together.
It’s a project that welcomes beginners while still engaging seasoned quilters, offering something for everyone.
Let’s dive into this wonderful experience of quilting with the Star Bright Mini Quilt.
It’s not just about stitching fabric together; it’s about creating a piece that tells your story.
So let your imagination run wild as we navigate through the steps of this beautiful pattern, perfect for showcasing how your style comes to life!
The Star Bright Mini Quilt: A Closer Look
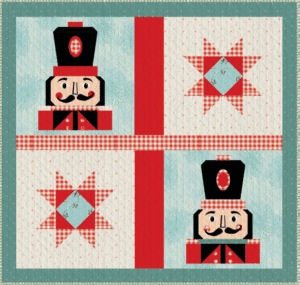
The Star Bright Mini Quilt is a timeless traditional block that many quilters cherish.
This classic design features a captivating star within a square, providing an excellent canvas for various fabrics.
Its simplicity is its strength; it makes a stunning visual impact while remaining beginner-friendly.
At only 18” x 18”, this quilt block is ideal for a mini quilt or can be combined with more blocks for larger projects.
What I love most about the Star Bright Mini Quilt is how it can blossom into a unique piece with just a change of color or pattern.
Choosing fabrics that resonate with you personalizes your quilt and tells your story.
That’s the beauty of this block—the possibilities are endless, and every quilt can be as different and unique as the quilter behind it!
Materials Needed
- A center square of 4 ½” x 4 ½”: This is the heart of your block.
Choose a fabric that either stands out or complements your design theme beautifully!
- 2 squares 4” x 4”: These squares need to be cut once diagonally to make 4 triangles, which will frame your center square.
- 2 squares 5” x 5”: Similar to the other squares, these need to be cut once diagonally to yield 4 triangles for the outer frame.
Preparation Tips Before You Start
Before hopping into the actual sewing of your Star Bright Mini Quilt, I recommend laying all your materials out in a clutter-free space.
It’s helpful to have everything you need within arm’s reach.
Choose your color palette wisely; bright contrasts can elevate your quilt, while softer tones can create a tranquil look.
Additionally, prepping your fabric by pressing it can make a world of difference!
It ensures that you are working with smooth and flat pieces, which leads to easier piecing and a more professional result.
Preparation truly sets the tone for the success of your quilting journey!
Step-by-Step Instructions:
Below, I’m excited to share the step-by-step process for piecing together your Star Bright Mini Quilt.
For more detailed instructions, the full pattern can be accessed in the link provided below the image.
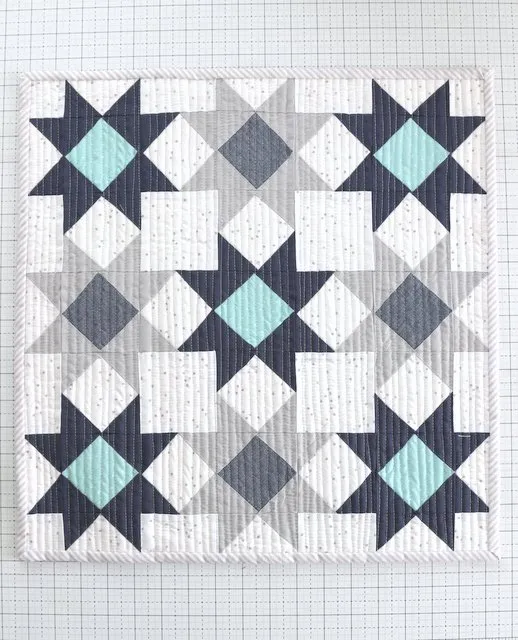
Full Pattern: Click Here
Additional Tips for Quilting Success
While creating your Star Bright Mini Quilt, remember to take your time with each step.
Rushing can lead to mistakes which might frustrate you, and we want this to be an enjoyable experience!
Use quality thread that matches or contrasts beautifully with your fabric choices; this little detail can enhance the overall appeal.
If you find yourself struggling with precise seams, don’t hesitate to use a ¼” foot on your sewing machine.
Precision is key to achieving clean lines and a polished look in your Star Bright Mini Quilt.
Remember, every quilt you make teaches you something new!
Design Considerations
As you work through your Star Bright Mini Quilt, consider how the patterns and colors interact with one another.
Will they clash or dance harmoniously together?
Balance is crucial in achieving that stunning final look.
Don’t shy away from mixing fabrics with noticeable patterns or textures; the fun of quilting is in exploring what works!
Another aspect to think about is the overall layout if you’re considering making multiple blocks.
Planning how the blocks will be arranged gives a thoughtful touch to your quilt’s final look.
Visualize your design, and don’t be afraid to rearrange blocks until they feel just right!
Celebrate Your Quilting Journey!
Congratulations on stepping into the world of quilting with the Star Bright Mini Quilt!
Each stitch brings you closer to mastering this beautiful craft, and I am here cheering you on every step of the way.
Remember to celebrate each small victory, whether it’s finishing a block or resolving a sewing mishap—each moment contributes to your journey as a quilter.
As you continue your creative exploration, don’t forget to check out the other amazing articles on this blog.
There’s a treasure trove of quilting wisdom waiting for you!
I’ve prepared an incredible piece just a click away, ready for your discovery by clicking here.
Happy quilting to you, my friend!